• Skip to main content
  • Skip to primary sidebar
  • Skip to footer

Daze and Knights

Do It Herself Parties and Projects

  • Home
  • About Me
  • Parties
  • DIY
  • Education
  • Products I Love
  • Parenting

DIY Upholstered Headboard {Tutorial}

December 21, 2012 19 Comments
Disclosure: This post may contain affiliate links. As an Amazon Associate I earn from qualifying purchases. Please visit our disclosure policy for more information. Thanks for your support!

Pin It

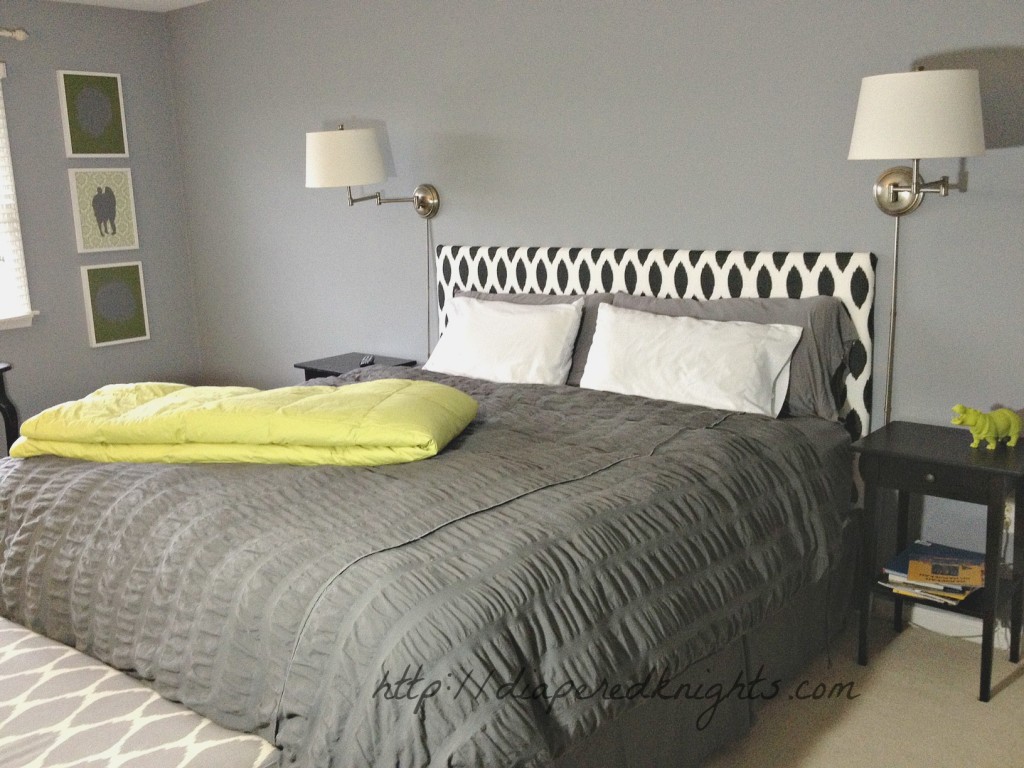
For months I have been eyeing beautiful upholstered headboards in catalogs dreaming of one for our new king-sized bed…and then I check the price tags and reality sets in.  Really?  A thousand dollars for some fabric, cushioning, and wood?  That is just not in this girl’s budget.

I decided I could probably make my own upholstered headboard.  And make one I did!

DIY Upholstered Headboard

I first measured the width of my bed and decided how high I wanted the headboard to go in the back.  I then trucked on over to Home Depot and had the trusty lumber guy cut a sheet of 3/4 inch plywood to size.

Back home, I prepared my materials.

1. I laid out my freshly-ironed fabric – design down (My choice: this 54” Wide Premier Prints Chipper Slub Charcoal Fabric).  The King Headboard used 3 yards of fabric, with plenty left over to make 2 throw pillows.

2. I laid down some quilt batting next, centered on the fabric.

3. I then stacked the foam on top of the batting.  My money-saving trick: Upholstery foam can be EXPENSIVE.  Instead I used a Carpenter Memory Foam Twin XL Mattress Topper.  Apparently no one buys these in the Twin X-Long bed size, because they are CHEAP on Amazon.  It is just the right size to fit across the back of a King headboard, though the foam will not go all the way to the floor.  (That was okay with me, as I didn’t see the need for foam covering the plywood UNDER the bed.)

4. Once all of these were laid out, I put the plywood on top.  I stretched the batting, foam, and fabric over the edges of the plywood, and used my staple gun to secure all three layers to the plywood.  Stretch. Staple. Repeat. (Times 1000).

This project seriously took less than a half-hour start to finish…and it has had a HUGE visual impact on the look of my room. I love inexpensive, easy home projects.  If you have a staple gun and the materials, you can make it yourself.

Anyone else here in the market for a new headboard?  Next on my list – some cute throw pillows for the bed!

Pin It

Check out these other ideas while you are here:

  • DIY Faux Grain Sack PoufDIY Faux Grain Sack Pouf
  • Why Are Coasters Always So BOOOORING?Why Are Coasters Always So BOOOORING?
  • DIY Ombre Chevron Painted OarDIY Ombre Chevron Painted Oar
  • DIY Life Preserver Pillow {Nautical Boys’ Bedroom}DIY Life Preserver Pillow {Nautical Boys’ Bedroom}
  • DIY Paper Mache Side Tables and Wall TreesDIY Paper Mache Side Tables and Wall Trees

Filed Under: DIY, home improvements Tagged With: bed, headboard, upholster

Previous Post: « Afraid of the Dark at Age 3 {Nuby Bedlite Buddies Review}
Next Post: Gluten Free for the Holidays {Udi’s Review} »

Reader Interactions

Comments

  1. Alissa says

    December 21, 2012 at 12:31 pm

    We’ve been without a headboard our entire married life. Not that we (well, I) haven’t wanted one. It just hasn’t been in the budget. I love the impact of this one. Looks like I might have a project for the new year!

  2. Brandi says

    December 21, 2012 at 3:13 pm

    Okay, this is probably a silly question, but then how did you attach it to the bed frame? Or did you hang it on the wall? I absolutely LOVE the look of it (you did a stellar job!) and can’t wait to try it! Thanks for sharing!!!

  3. diaperedknights says

    December 21, 2012 at 3:38 pm

    Brandi – that’s a great question. Since this is a (very heavy) King-sized bed, I just slid it between the wall and the bed frame. However, you could also do one of the following: (1) Drill onto the bed frame (my cheapo frame has holes at the end for attaching), (2) drill and secure it to the wall, or (3) hang from the wall with heavy-duty picture hangers (the ones that look like alligator teeth). I would probably get the hangers rated for 50-100 pounds and put 2-3 of them spaced evenly across the back of the frame, maybe 2-3 inches from the top. However, mine is not going ANYWHERE and it is not attached…if your bed is heavy like mine, I would just slide it in between!

  4. Brandi says

    December 21, 2012 at 3:51 pm

    Awesome! That’s easy-peasy! Thanks!!

  5. EmGusk says

    December 27, 2012 at 4:55 pm

    Heather, what’s at the foot of your bed? Does it have storage capabilities? (I think I might do this headboard thing, but I don’t own a staple gun!!)

    Miss you.

    xo

  6. diaperedknights says

    January 1, 2013 at 4:09 pm

    It is an upholstered bench from West Elm 🙂 I love it.

  7. aditi says

    January 3, 2013 at 3:29 pm

    do u mind sharing, how much did u pay for each item roughly, esp the amazon mattress topper? i m currently seeing that for $19.99
    Also plz let me know how much u had to pay roughly for other items, thnx 🙂

  8. diaperedknights says

    January 3, 2013 at 8:39 pm

    Great question!
    The mattress topper was $19.99. (Similar upholstery foam and other mattress toppers in this size were $40-100.) Oddly, this was the most expensive item!
    The fabric was from fabric.com for $5.98 a yard. (I bought 3 yards of 54″ width fabric. I really only needed 2.5 yards for the King bed.)
    The plywood was from Home Depot for about $15.
    The quilt batting was $5 on fabric.com.
    Total = $58.

  9. aditi says

    January 3, 2013 at 10:03 pm

    awesome. thnx for sharing this 🙂 u did a great job.

  10. Aditi Rana says

    May 19, 2013 at 6:18 pm

    about to start this project, can u let me know if your plywood is 1 piece or two pieces attached at center……

  11. Heather says

    May 19, 2013 at 7:59 pm

    I used two pieces, connected with a heavy layer of duct tape, only because I could not fit a King-sized piece of Plywood in my car. We have used the headboard for 6 months so far, and it looks new. If you are putting it between the wall and the bed, the duct tape, batting, and fabric will hold everything tightly in place. Make sure to use a staple gun for connecting the fabric/batting to the plywood! I’d love to see (and share!) your final project if you send along a picture 🙂

  12. Aditi Rana says

    May 19, 2013 at 11:34 pm

    thnx a lot 🙂 same is my problem, 1 pc wont fit in my car. To tell u frankly…i m pathetic at any craft work I do. Lets see how this one goes. I am going to send u the pic once its complete. I am doing this with my friend …we are going shopping for stuff tomorrow. I have no idea what a batting is…I hope my friend knows about it.

  13. Heather says

    May 20, 2013 at 7:30 am

    It really is an easy project, so you made a good choice for a project to tackle. Batting will be found at a craft store. It comes in rolls and is like soft fluff that you can roll out to make the plywood cushioned. Can’t wait to see the picture!

  14. Aditi Rana says

    May 20, 2013 at 11:47 pm

    I gathered all stuff today. But I went to HD to buy plywood…and i was looking for 78 inches* 48 inches and the cheapest option was costing me $45. I came back without buying so that I can ask you if you know cheaper options…i was expectin g to pay arnd $15 as you

  15. Aditi Rana says

    May 20, 2013 at 11:58 pm

    did u buy chance use 1/4th inch plywood instead of 3/4 th inch. Because 1/4 th inch was costing me around $15

  16. Laura says

    April 27, 2014 at 1:21 am

    Hello! I was just wondering if the headboard had legs or if it just went straight to the ground? And if it has legs how did you attach them?

  17. Heather says

    April 27, 2014 at 7:26 pm

    Hi Laura, I cut the plywood high enough so I didn’t need legs. It is literally a huge rectangle of plywood. I actually didn’t upholster the bottom foot of the headboard since it is not visible (we have a bedskirt on the bed). Even without the bedskirt, unless your bed is high, I do not think it would be visible.

Trackbacks

  1. Classically B says:
    March 13, 2014 at 8:28 am

    […] simple to DIY an upholstered headboard and there are tons of tutorials out there like this one and this one.  I made one in navy blue for my first apartment and it was easy and […]

  2. Super Easy "Design Your Own" Farmhouse Bedding says:
    March 14, 2017 at 4:32 pm

    […] Did you know that you can design your own bedding at Shutterfly? In my mind there is nothing more inviting than an all white bed, so when designing a duvet cover on Shutterfly’s site, I went with our name and anniversary date in a dark gray font at the bottom of the duvet cover. I think it gives a farmhouse feel, but still sticks with the modern look of the DIY headboard. […]

Leave a Reply Cancel reply

Your email address will not be published.

Show more posts

This site uses Akismet to reduce spam. Learn how your comment data is processed.

Primary Sidebar

  • Bloglovin
  • Email
  • Facebook
  • Google+
  • Instagram
  • Pinterest
  • Twitter

Categories

Disclosure
Terms of Service
Privacy Policy
Networks

Footer


Heather Schugar is an educator, author, and mom-of-all-trades. She holds a Ph.D. in Curriculum and Instruction, and her work has has been featured in national outlets such as The New York Times, The Atlantic, Real Simple magazine, and Men’s Fitness.

  • Home
  • Contact Me
  • About Me
  • Disclosure/PR
  • Terms of Service
  • Privacy Policy


Watch Us, Instantly!

Copyright © 2021 Daze and Knights | Design by Tech·mom·o·gy Designs™.